

Why You Might Need to Find Your Saved Passwords
These days, with so many online accounts and passwords to keep track of, it can be a real headache. Luckily, most modern operating systems and web browsers have built-in features that can securely store and manage credentials for you. These features save your login details so you don't have to enter them every time you visit a website. They also give you one place where you can see all your saved data.
So saved passwords are very convenient – until you need them and can’t remember where they are.
In this article, you'll find clear step-by-step guides for locating your stored passwords across major platforms and browsers: Chrome, Safari, Firefox, on both mobile and desktop.
How to Find My Saved Passwords on Web Browsers
My saved passwords on this device Chrome
Google Chrome provides two straightforward methods for accessing saved passwords on a desktop computer.
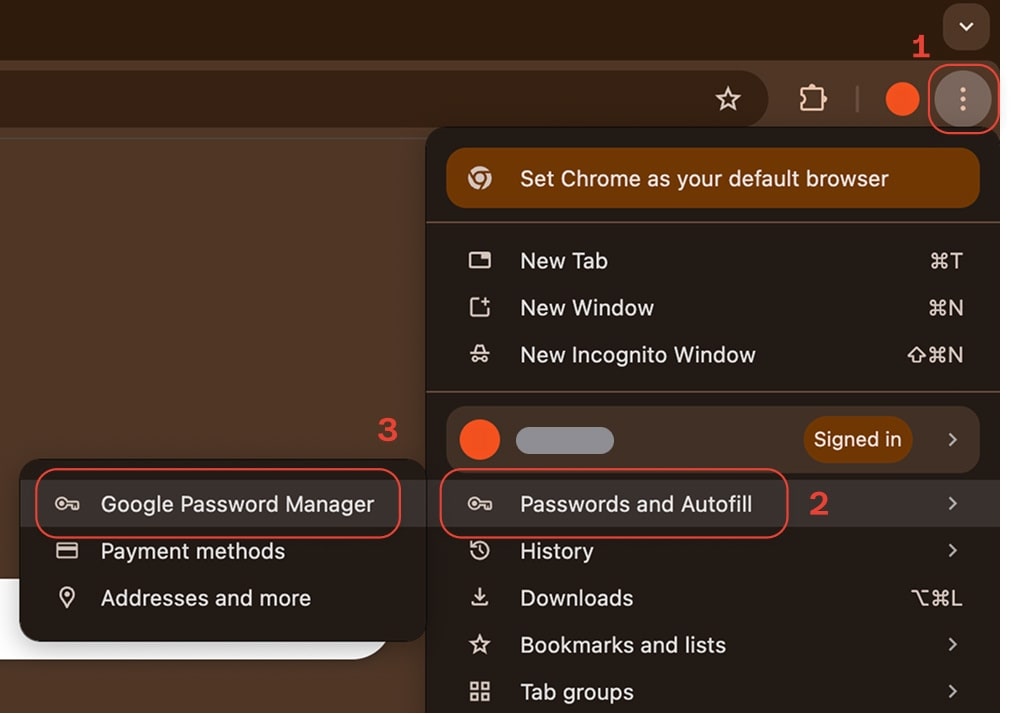
1. Primary Method (Menu Navigation):
- Open the Google Chrome browser.
- Click the three-dot menu icon (⋮) located in the top-right corner of the browser window.
- In the dropdown menu, hover your mouse cursor over the Passwords and Autofill option.
- A submenu will appear. Click on Google Password Manager. This action will open the password manager interface in a new browser tab.
- A list of all websites for which you have saved credentials will be displayed. A search bar at the top of the page allows for quickly finding a specific site.
- Click the eye icon next to a password (you’ll need to enter your device password).
2. Alternative Method (Profile Icon):
- Click on your circular Profile icon, which is displayed to the left of the three-dot menu at the top right of the browser.
- In the menu that appears, click the key icon (🔑), labeled Passwords and Autofill. This provides a direct shortcut to the Google Password Manager.
⚠️ Your saved passwords belong to your Google Account, not just the Chrome browser. Google has made its password manager a central, cloud-based service. This means any password you save or update on your phone is instantly synced to all devices signed into your account. You can access this vault from any browser, including Safari or Firefox, by going to passwords.google.com.
My saved passwords on this device Safari
For macOS Sonoma and earlier:
- Open Safari.
- Click Safari in the top menu bar (next to the Apple logo).
- Go to Settings... (or Preferences... on older macOS versions).

- Click the Passwords tab.
- You will be prompted to authenticate to prove your identity. Enter your Mac's user account password or use Touch ID if your device supports it.
For macOS Sequoia and later:
With the release of macOS Sequoia, Apple introduced a dedicated Passwords application. While the method of accessing passwords through Safari's settings may remain, Apple now guides users toward this new, centralized app for a more comprehensive management experience.
Check this guide on how to access them, or refer to the section below.
On iPhone or iPad:
Safari on the iPhone and iPad does not contain its own, separate password manager. Instead, it acts as a direct interface to the core password system of iOS, which is powered by iCloud Keychain. When you save a password in Safari on your iPhone, it is automatically stored in this central vault.
This means that any password saved via Safari is immediately accessible through the main Passwords section of the iOS Settings app (or the dedicated Passwords app on iOS 18 and later). This unified approach prevents data fragmentation and ensures a consistent experience. Read detailed instructions on accessing this central vault on your iPhone, or refer to the section below.
My saved passwords on this device Firefox
Mozilla Firefox offers a robust, built-in password manager with a strong emphasis on user privacy and control.
1. Primary Method (Menu Shortcut):
- Open the Mozilla Firefox browser.
- Click the hamburger menu icon (≡) in the top-right corner.
- In the dropdown menu, select Passwords (this may be labeled Logins and Passwords in some versions). This action opens the main password management page in a new tab.
- On this page, a list of all your saved logins will appear in a panel on the left. A search box at the top of this panel allows you to filter the list by website, username, or password.
- To reveal the password, click the eye icon (👁️). For security, Firefox may prompt you to enter your computer's main login password (your Windows password or macOS user password) before displaying the credential.
2. Alternative Method (Settings Menu):
- Click the hamburger menu icon (≡) and select Settings from the menu.
- In the Settings tab, click on the Privacy & Security panel on the left-hand side.
- Scroll down the page until you find the Logins and Passwords section.
- Click the Saved Logins... button to open the password management page.
Firefox's "Primary Password" and Local-First Encryption
Firefox's approach to password management is a reflection of its long-standing commitment to user privacy and local data control. Firefox's system is different from Google's cloud-first model. It's built on a foundation of locally stored encrypted files (key4.db and logins.json) located within a user's profile folder on their computer. This local-first architecture is made even better by an optional security feature called the
Primary Password (formerly Master Password).
When you set a Primary Password, Firefox uses it to add a strong layer of encryption to your local password files. So, if someone gets into your unlocked computer without your permission, they won't be able to see your passwords. They won't be able to copy them or export them without entering this separate, unique Primary Password first. This gives you a level of local security that's stronger than the default settings of a lot of other browsers.
For the user, this distinction is critical. Enabling the Primary Password is a big security upgrade. Also, it shows that if you don't use a Mozilla Account to sync your passwords, they're only stored on that computer.
How to Find My Saved Passwords on Mobile Devices
My saved passwords on this device Android
The Android operating system provides deep integration with the Google Password Manager, making it accessible directly from the device's settings.
(Note: exact menu names may vary slightly between Android versions and device manufacturers like Samsung or Pixel).
- Open the Settings app on your Android device.
- One common path is to scroll down and tap on Google.
- On the next screen, tap Manage your Google Account.
- Swipe through the tabs at the top to find and select the Security tab.
- Scroll down the Security page until you find the Password Manager option and tap it.
A faster, more universal method: In the main Settings app, use the search bar at the top. Type Password Manager or Passwords & accounts. This will typically provide a direct link to the correct settings page, bypassing several steps.
My saved passwords on this device iPhone
With iOS 18, Apple introduced a standalone Passwords app, elevating password management to a first-class feature.
Steps for iOS 18 and Later – Passwords App:
- Tap the Passwords app icon on your iPhone's Home Screen.
- The app will require you to authenticate immediately using Face ID, Touch ID, or your device's passcode for security.
- Once unlocked, the app presents a well-organized interface, categorizing your credentials into sections like All, Passkeys, and Wi-Fi Passwords.
- Tap on any account in the list to view its details. The password will be displayed, and you can tap on it to copy it.

The Classic Method: Using the Settings Menu (iOS 17 and earlier)
For iPhones running iOS 17 or older versions, passwords are managed within the Settings app.
Steps:
- Open the Settings app from your Home Screen.
- Scroll down the main list and tap on Passwords. (Note: On very old versions like iOS 13, the path was Passwords & Accounts, followed by Website & App Passwords ).
- You will be prompted to authenticate with Face ID, Touch ID, or your passcode.
- After authentication, a searchable list of all your saved accounts will be displayed.
- Tap on any entry to view the saved username and password.

The Voice Method: Using Siri
Siri provides a fast, hands-free way to access your saved credentials on any modern iPhone.
Steps:
- Activate Siri by saying "Hey Siri" or by long-pressing the side button (on iPhones with Face ID) or the Home button.
- Give a voice command. You can be general, such as "Show my passwords," or specific, like "What is my Spotify password?".
- Siri will open the Passwords interface and prompt you to authenticate with Face ID, Touch ID, or your passcode before displaying any information.
How to Find My Saved Passwords on Desktop Systems
My saved passwords on this device Windows
On Windows, most password management happens through browsers (check further up in this article), but some credentials (like Wi-Fi keys or Microsoft account logins) are buried deeper.
The Windows Credential Manager is a built-in utility that stores login information for various services and websites.
Steps to find a Windows Credential Manager (for system-level passwords):
- Click the Start Menu button or press the Windows key on your keyboard.
- In the search bar, type Credential Manager and press the Enter key.
- From the search results, click on the Credential Manager Control Panel.
- The Credential Manager window is organized into two primary categories: Web Credentials and Windows Credentials.
- Click on Web Credentials to view login information that has been saved by Microsoft's browsers (Microsoft Edge and the legacy Internet Explorer) and certain other Windows applications.
- A list of saved entries will be displayed. Click the small downward-pointing arrow on the right side of an entry to expand its details.
- Click the Show link that appears next to the masked password field.
- A Windows Security window will pop up, requiring you to verify your identity by entering your Windows user account password or PIN. Once authenticated, the password will be displayed in plain text.
This tool shows saved network credentials, Windows login info, and some browser logins. It's handy – but again, vulnerable if your system is not encrypted.
My saved passwords on this device Mac
Apple has really simplified password access on macOS, moving it from a niche utility to a prominent feature within System Settings and, most recently, a standalone application.
For macOS Ventura & Sonoma:
- Click the Apple menu located in the top-left corner of the screen.
- From the dropdown menu, select System Settings.
- In the System Settings window, scroll down the left-hand sidebar and click on Passwords, which is marked with a key icon.
- You will be prompted to authenticate using your Mac's login password or Touch ID to access the secure data.
- Once unlocked, a list of all saved accounts will appear. Select any account to view its details, then click the Edit button to see the username, password, and any associated notes.
For macOS Sequoia and newer:
- Open Launchpad from your Dock, or use Spotlight Search by pressing Command + Spacebar.
- Type Passwords and open the dedicated Passwords application.
- Authenticate using your Mac's password, Touch ID, or a paired Apple Watch to unlock the app.
- The app provides a clean, organized interface displaying all saved passwords, passkeys, Wi-Fi codes, and verification codes, all of which can be easily searched and managed.
Advanced Management and Password Security Best Practices
Moving beyond simply storing passwords requires a deliberate strategy. It’s about building a fortress, not just a filing cabinet. Here are the expert-level best practices to take control.
- Practice "One Lock, One Key." The worst mistake you can make is reusing a password. You've got to use a strong, unique password for every account. No repeats, please. Why is this a problem? Hackers use a technique called "credential stuffing," where they take lists of logins from a data breach on one weak site (like an old forum) and try them on every other major service (like your bank or email). If you reuse passwords, they'll get in.
- Use Passphrases. A passphrase may be far superior to a password. Think of a short, memorable, five-word sentence like Penguins-Drive-Cars-At-Night. It's incredibly long and complex for a computer to brute-force, yet simple for you to remember.
- Enable 2FA. Two-Factor Authentication (2FA) is non-negotiable. Enable it wherever possible. It means that even if a thief steals your password, they can't get in without a second piece of information, usually a code from your phone.
- Perform Regular Password Health Checkups. Both Google's Password Checkup and Apple's Security Recommendations automatically scan your saved logins. They are designed to flag any passwords that are weak, have been reused, or, most frighteningly, have appeared in known data breaches. Listen to these warnings. Auditing your saved passwords regularly and removing old or duplicated logins isn't just spring cleaning; it's critical security hygiene.
- Be Selectively Paranoid: Turn Off Autofill. For your most critical accounts (like banking, crypto wallets, primary work email), turn off your browser's password-saving feature entirely. The slight inconvenience of typing it in manually is a tiny price to pay for knowing your most valuable digital keys aren't sitting in a location that's a prime target for malware.
- The Ultimate Backdoor: Your Recovery Email. Here is the most critical point. Every security measure we've discussed can be bypassed by a single "Forgot Password" link. And where does that link go? Typically, to your email. Your recovery email is the skeleton key to your entire digital life. Using a standard, unencrypted email for this purpose is like putting a titanium lock on a cardboard door. You must use a secure, encrypted email for account recovery and password resets.
This leads to a final, expert-level principle: Keep your paths separate. The email address you give to friends or use for newsletters should never be the same one you use for authentication and securing your financial identity. Your recovery channel must be a fortress, silent and protected, used for nothing else.
How Atomic Mail Protects Your Digital Identity
We’ve established a critical truth: for the vast majority of people, email is the master key to their digital life.
Think about it. It’s the go-to place for account recovery, the inbox where password reset links land, and the first stop for authentication codes that verify your identity. This gives your email an extraordinary amount of power.
It's the ultimate fallback, the universal key. So, why are you protecting it with a service that reads your emails, targets you with ads, and offers only a basic layer of protection?
Atomic Mail doesn’t work that way. We built our service from the ground up with a single mission: to make true digital privacy the default standard.
Here’s how we protect that foundation:
- Zero-access encryption: We can't read your emails. We can't reset your password without your consent. You're the only one with the keys.
- End-to-end encryption for internal and external communication: Every message, whether it stays within Atomic or goes outside, is encrypted from your device to the recipient.
- Anonymous sign-up: No phone number, no personal data required. You can create an account without revealing your identity.
- Data minimization: We don’t collect what we don’t need. Less data stored = less risk.
- Seed phrase recovery: Instead of relying on backup emails or recovery questions (which are often weak points), you get a unique recovery seed phrase, just like with crypto wallets.
- No trackers, no profiling: We don’t mine your messages. You are not the product.
- Alias creation: Protect your real email. Use unique email aliases for websites and services. Kill spam and minimize breaches.
Switching to an encrypted, private email service like Atomic Mail is a fundamental upgrade to your entire security posture. It ensures that the recovery channel for all your other accounts is a locked vault, not an open book. It’s the move from simply reacting to threats to proactively making yourself invisible to them.
Sign up today and secure your foundation. Upgrade your security and your privacy with Atomic Mail.